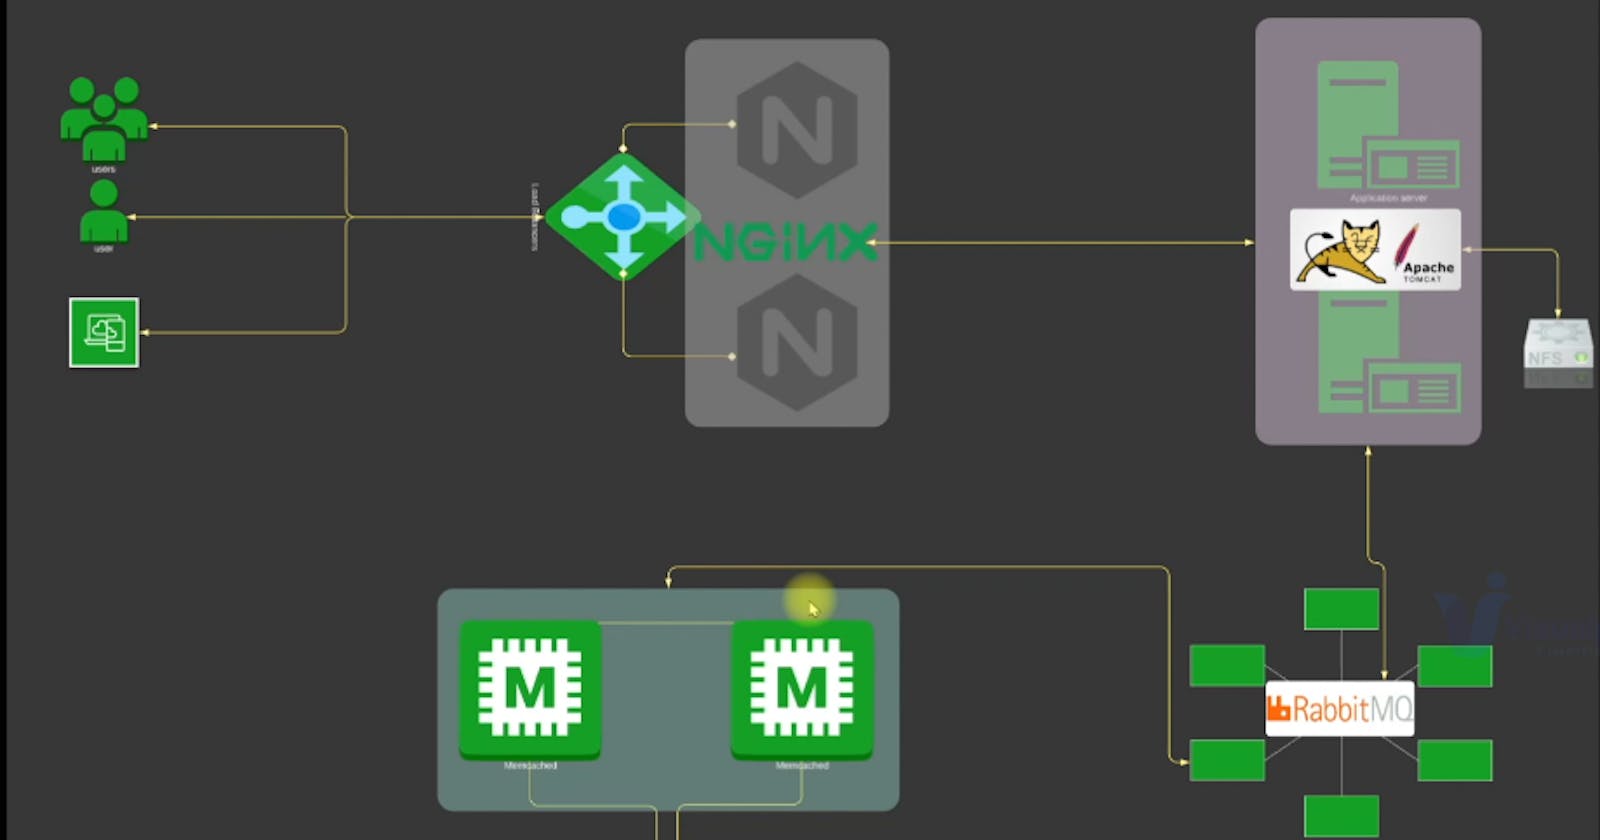


In the world of cloud computing, there's a transformative approach known as "Lift and Shift." It's a strategy that allows you to migrate your existing on-premises applications to the cloud, specifically to Amazon Web Services (AWS), with minimal code changes. This approach offers the benefits of scalability, reliability, and cost-efficiency, making it an attractive proposition for many businesses.
In this project, I'm excited to share my journey through an AWS Lift and Shift migration. The project's primary goal is to move our existing on-premises application to the AWS cloud while retaining the core structure of our application, its data, and its functionality.
The Prerequisites
Before diving into the project, I made sure we had all the necessary prerequisites in place:
AWS Account: This serves as our gateway to the vast AWS ecosystem.
EC2 Instances: These virtual machines in the AWS cloud will host our application.
DNS Name (Route 53): We needed a registered domain name for our application, managed via AWS Route 53.
Maven: This is our trusty tool for building our application.
JDK 8: Java Development Kit version 8 is essential for running our Java application.
AWS CLI: We used the AWS Command Line Interface to interact with AWS services.
S3: Amazon Simple Storage Service was our choice for storing artifacts.
Vagrant (For Local App Build): Vagrant played a vital role in creating and configuring our development environments locally.
Create All Security Groups: We meticulously set up security groups for different components to control traffic flow.
Creating Security Groups
In the beginning stages of the project, I created different security groups to control the traffic coming in and going out of my resources. Each security group was made to fit the specific needs of the things it was protecting.
For example, the security group for my load balancer was named 'vprofile-ELB-SG.' I set it up so that it allowed both HTTP (port 80) and HTTPS (port 443) traffic from anywhere. This meant that my application could be reached by users from all over the internet.
Next, I made another security group for my Tomcat server, calling it 'vprofile-app-SG.' This group was designed to open up port 8080 so that it could receive connections from the load balancer's security group. I also opened up SSH port 22 to make it possible for me to connect to the instance when I needed to do some maintenance.
Then, for my backend services, I created the 'vprofile-backend-SG.' This security group allowed traffic on ports 3306 for MySQL, 11211 for Memcached, and 5672 for RabbitMQ. I also made sure that all the traffic inside this group could flow freely to let my backend services communicate with each other.
Key Pair Creation
To ensure secure access to our EC2 instances, we created a key pair named vprofile-prod-key. This key pair would enable us to establish SSH connections to our instances.
Provisioning Backend Instances
A big part of my Lift and Shift project was moving our database to AWS. I set up a database instance called 'vprofile-db01' with the project name 'vprofile.' For this, I used the CentOS 7 AMI. I picked the t2.micro instance type and made sure it used the 'vprofile-backend-SG' security group.
To make this process smoother, I used a special script called 'mysql.sh' in the instance's UserData. This script took care of setting up the MySQL server on the instance. It did things like opening the right ports, creating and securing the database, and loading data into it automatically. This made the whole database migration process much more efficient.
#!/bin/bash
DATABASE_PASS='admin123'
sudo yum update -y
sudo yum install epel-release -y
sudo yum install git zip unzip -y
sudo yum install mariadb-server -y


# starting & enabling mariadb-server
sudo systemctl start mariadb
sudo systemctl enable mariadb
cd /tmp/
git clone -b local-setup https://github.com/devopshydclub/vprofile-project.git
#restore the dump file for the application
sudo mysqladmin -u root password "$DATABASE_PASS"
sudo mysql -u root -p"$DATABASE_PASS" -e "UPDATE mysql.user SET Password=PASSWORD('$DATABASE_PASS') WHERE User='root'"
sudo mysql -u root -p"$DATABASE_PASS" -e "DELETE FROM mysql.user WHERE User='root' AND Host NOT IN ('localhost', '127.0.0.1', '::1')"
sudo mysql -u root -p"$DATABASE_PASS" -e "DELETE FROM mysql.user WHERE User=''"
sudo mysql -u root -p"$DATABASE_PASS" -e "DELETE FROM mysql.db WHERE Db='test' OR Db='test\_%'"
sudo mysql -u root -p"$DATABASE_PASS" -e "FLUSH PRIVILEGES"
sudo mysql -u root -p"$DATABASE_PASS" -e "create database accounts"
sudo mysql -u root -p"$DATABASE_PASS" -e "grant all privileges on accounts.* TO 'admin'@'localhost' identified by 'admin123'"
sudo mysql -u root -p"$DATABASE_PASS" -e "grant all privileges on accounts.* TO 'admin'@'%' identified by 'admin123'"
sudo mysql -u root -p"$DATABASE_PASS" accounts < /tmp/vprofile-project/src/main/resources/db_backup.sql
sudo mysql -u root -p"$DATABASE_PASS" -e "FLUSH PRIVILEGES"

# Restart mariadb-server
sudo systemctl restart mariadb


#starting the firewall and allowing the mariadb to access from port no. 3306
sudo systemctl start firewalld
sudo systemctl enable firewalld
sudo firewall-cmd --get-active-zones
sudo firewall-cmd --zone=public --add-port=3306/tcp --permanent
sudo firewall-cmd --reload
sudo systemctl restart mariadb
Memcached and RabbitMQ Instances
Besides setting up the database, I also had to make sure we had Memcached and RabbitMQ instances ready to go. The process for these two services was quite similar.
I created instances called 'vprofile-mc01' for Memcached and 'vprofile-rmq01' for RabbitMQ. These instances had the same project name, used the same AMI, were of the same instance type, and had the 'vprofile-backend-SG' security group.
Each of these instances had a special script in their UserData. For Memcached, it was 'memcache.sh,' and for RabbitMQ, it was 'rabbitmq.sh.' These scripts took care of the installation and setup of Memcached and RabbitMQ, making sure these critical components of our application were up and running smoothly.
#!/bin/bash
sudo yum install epel-release -y
sudo yum install memcached -y
sudo systemctl start memcached
sudo systemctl enable memcached
sudo systemctl status memcached
sudo memcached -p 11211 -U 11111 -u memcached -d
#!/bin/bash
sudo yum install epel-release -y
sudo yum update -y
sudo yum install wget -y
cd /tmp/
wget http://packages.erlang-solutions.com/erlang-solutions-2.0-1.noarch.rpm
sudo rpm -Uvh erlang-solutions-2.0-1.noarch.rpm
sudo yum -y install erlang socat
curl -s https://packagecloud.io/install/repositories/rabbitmq/rabbitmq-server/script.rpm.sh | sudo bash
sudo yum install rabbitmq-server -y
sudo systemctl start rabbitmq-server
sudo systemctl enable rabbitmq-server
sudo systemctl status rabbitmq-server
sudo sh -c 'echo "[{rabbit, [{loopback_users, []}]}]." > /etc/rabbitmq/rabbitmq.config'
sudo rabbitmqctl add_user test test
sudo rabbitmqctl set_user_tags test administrator
sudo systemctl restart rabbitmq-server
Private Hosted Zone in Route 53
With our backend services operating smoothly in the AWS cloud, I turned my attention to ensuring their accessibility. I created a private hosted zone in Route 53, naming it 'vprofile.in.' This hosted zone allowed me to associate private IP addresses with human-readable domain names, ensuring seamless communication between the components of my application.Provisioning Application EC2 Instances
Our application wasn't complete without the frontend components. We provisioned an EC2 instance named vprofile-app01 with the same project name, AMI, and vprofile-app-SG security group. This instance was configured to run our Java-based application.
The key to getting our application up and running was the UserData script, tomcat_ubuntu.sh. This script handled everything from updating the instance to installing Java, Tomcat, and the application itself.
tomcat_ubuntu.sh:
#!/bin/bash
sudo apt update
sudo apt upgrade -y
sudo apt install openjdk-8-jdk -y
sudo apt install tomcat8 tomcat8-admin tomcat8-docs tomcat8-common git -y
Creating Artifacts with Maven
Additionally, I needed to create a web application archive (WAR) file, a standard package for Java web applications. This process included cloning our application's repository and making the required configuration changes in the 'application.properties' file.
The 'application.properties' file played a crucial role as it's where we specified the record names for our backend services. This step was vital to enable our application to communicate with the database, Memcached, and RabbitMQ. With all configurations properly set up, I executed the 'mvn install' command to generate our application artifact, which we named 'vprofile-v2.war.'
jdbc.url=jdbc:mysql://db01.vprofile.in:3306/accounts?useUnicode=true&

memcached.active.host=mc01.vprofile.in

rabbitmq.address=rmq01.vprofile.in
Setting Up S3 for Artifact Storage
With our application artifact ready, the next step was to find a secure and dependable place to store it. We decided to go with Amazon S3. Using the AWS CLI, I created an S3 bucket and gave it the name 'vprofile-artifact-storage-rd.' This bucket was designated as the repository for our application artifacts.
To ensure secure and authenticated access to the S3 bucket, I set up an IAM user and assigned the necessary policies. This gave the user the required permissions to interact with the bucket and maintain the security of our stored artifacts.
We also utilized the AWS CLI to copy our 'vprofile-v2.war' artifact to the S3 bucket, guaranteeing that it was readily accessible for our application servers. This made sure our application had a reliable source for retrieving its essential components.
Configuring the Tomcat Server
With the artifact safely stored in S3, it was time to configure our Tomcat server running on the vprofile-app01 instance. We established an SSH connection to the instance using the vprofile-prod-key.pem key pair.
After stopping the Tomcat server and removing the default application, we installed the AWS CLI on the instance to facilitate artifact download. We fetched the vprofile-v2.war from the S3 bucket and deployed it as ROOT.war in the Tomcat webapps directory.
Setting Up the Load Balancer
With our application artifact ready, the next step was to find a secure and dependable place to store it. We decided to go with Amazon S3. Using the AWS CLI, I created an S3 bucket and gave it the name 'vprofile-artifact-storage-rd.' This bucket was designated as the repository for our application artifacts.
To ensure secure and authenticated access to the S3 bucket, I set up an IAM user and assigned the necessary policies. This gave the user the required permissions to interact with the bucket and maintain the security of our stored artifacts.
We also utilized the AWS CLI to copy our 'vprofile-v2.war' artifact to the S3 bucket, guaranteeing that it was readily accessible for our application servers. This made sure our application had a reliable source for retrieving its essential components.
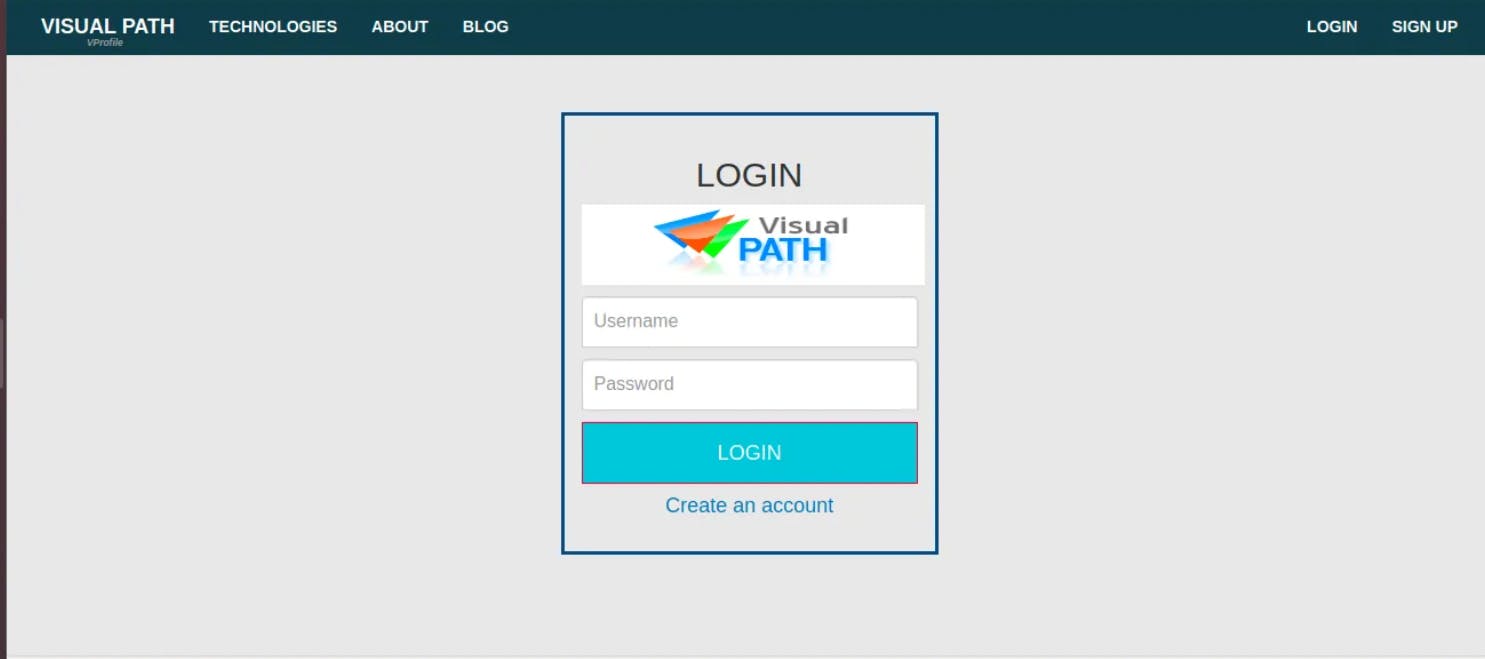
Testing and Deployment
With all the components set up and our application now residing in the cloud, it was time to perform comprehensive testing. To do this:
I accessed our application through the load balancer's DNS link, ensuring that it worked correctly. This step was crucial to verify that our migration and setup processes had been successful, and our application was functioning as expected.
Clean-Up
As our project reached a successful conclusion, I realized the significance of cleaning up the resources we had generated. This step was crucial to prevent unnecessary AWS charges. To maintain an efficient and cost-effective cloud infrastructure, I carefully removed instances that were no longer needed and deleted any unused resources.
This AWS Lift and Shift project was indeed a journey. It allowed me to embrace the cloud's scalability, reliability, and efficiency while preserving our application's core functionality. It served as a powerful demonstration of how AWS services can aid businesses in transitioning to the cloud with minimal disruption. By following the Lift and Shift approach, I successfully retained the foundation of our application while reaping the benefits of cloud technology.