Containerizing an Microservices Application: Node.js, Angular, Java, and Nginx (E-Commerce)
Microservices are like building blocks for software, organizing an application into small, independent services that can stand alone. Each of these services has a specific job and can be developed and updated without affecting the others.
In the world of microservices, the application is divided into these small, self-contained units that talk to each other using clear rules (APIs). They can be created using different tools and languages, as long as they can communicate well.
However, this approach brings its own set of challenges, such as managing different parts of the system, making sure they all talk to each other correctly, keeping data consistent, and keeping an eye on how they interact.
In the end, microservices offer a flexible and scalable way to build big and complex applications. They break down the application into smaller, more manageable pieces that can be developed and updated on their own.
The Project: Containerizing an E-Commerce Application
This project focuses on putting an E-Commerce Application into containers. The application is made up of loosely connected microservices.
Architectural Design

Overview:
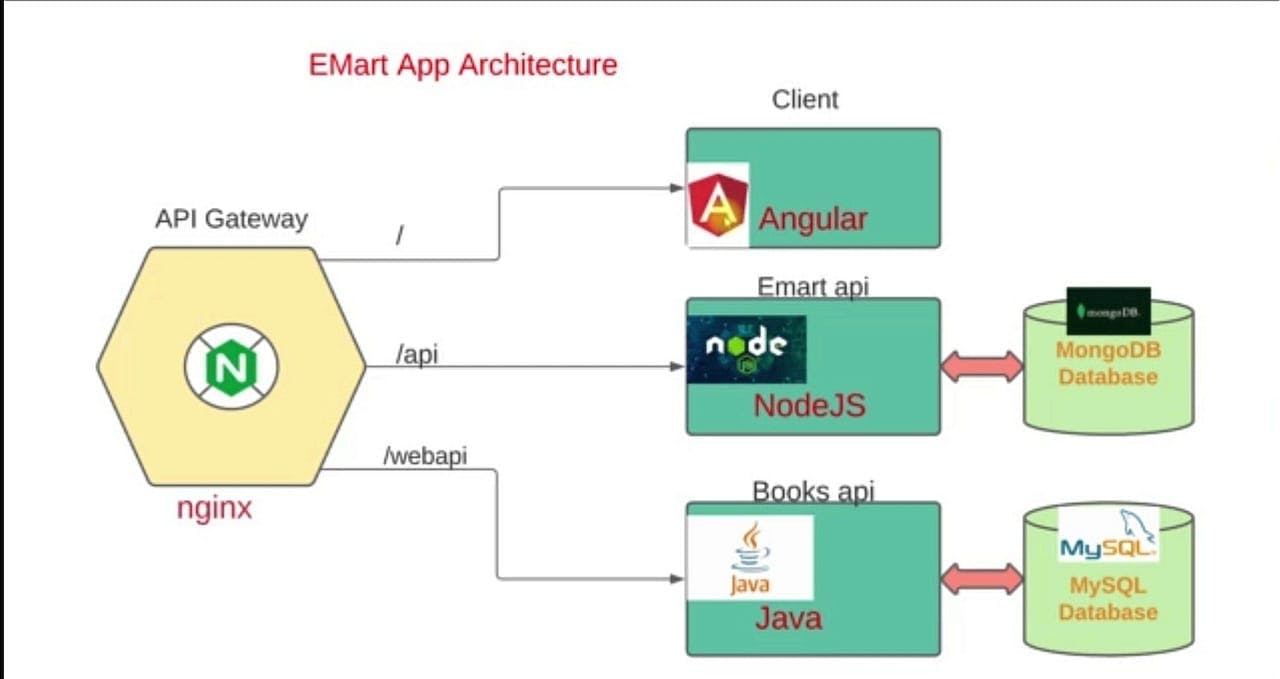
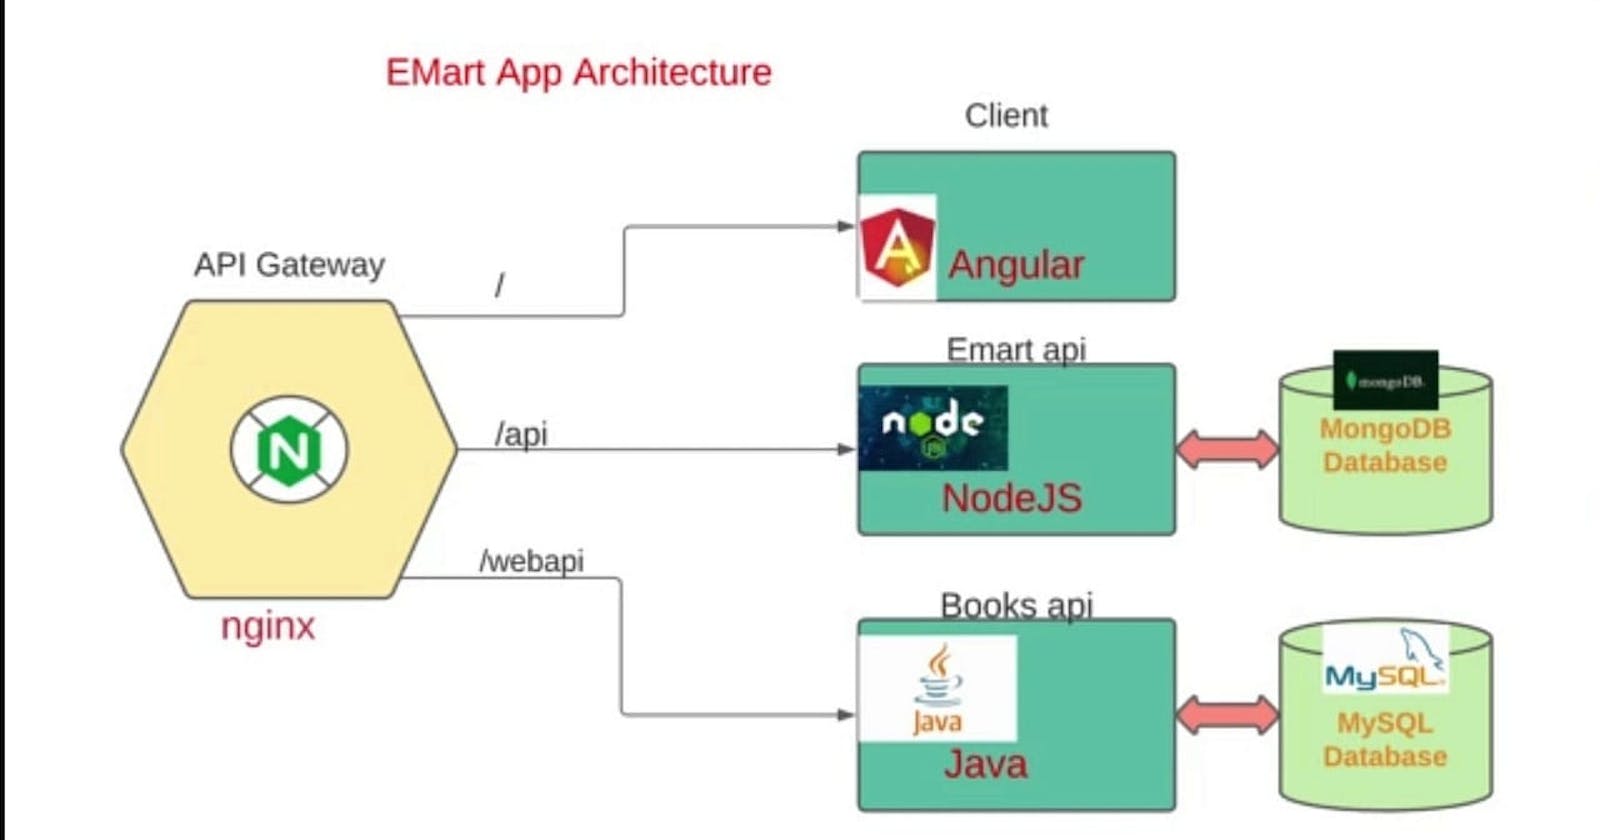
We access the E-commerce Application through Nginx (API Gateway), which waits for requests and directs them to the Client microservice (Angular) using URLs. This part loads the main pages of the website.
The client API uses an Nginx configuration to send requests to the backend services— the Emart API and Books API. The Emart API (NodeJS) uses a NoSQL database service, MongoDB, and is accessed on /api. The Books API (Java) uses a MySQL database and is accessed on /webapi.
The Four Microservices to be Containerized Include:
Node.js Microservice: This is a backend service built with Node.js and Express.
Angular Microservice: A frontend application built with Angular.
Java Microservice: Another backend service built with Java and Spring Boot.
Nginx: This acts as a web server for routing and load balancing.
In this project, we'll containerize each of these microservices, making it easier to manage and deploy the entire E-Commerce Application. This way, each part can work on its own while still contributing to the overall functionality.
Frontend Containerization with Angular and Nginx
Frontend (Angular)
The process begins with containerizing the Angular frontend. The Dockerfile for this task is as follows:
# client Dockerfile
FROM node:14 AS web-build
WORKDIR /usr/src/app
COPY ./ ./client
RUN cd client && npm install && npm run build --prod

# Use official nginx image as the base image
FROM nginx:latest

# Copy the build output to replace the default nginx contents.
COPY --from=web-build /usr/src/app/client/dist/client/ /usr/share/nginx/html
COPY nginx.conf /etc/nginx/conf.d/default.conf

# Expose port 4200
EXPOSE 4200
Here, we first build the Angular application and then integrate it into an Nginx image. The final container becomes a standalone unit for the frontend.
Reverse Proxy Configuration (Nginx)
To facilitate communication between frontend and backend services, I created an Nginx configuration file (nginx.conf):
# nginx.conf
upstream client {
    server client:4200;
}

server {
    listen 80;

    location / {
        proxy_set_header Host $host;
        proxy_set_header X-Real-IP $remote_addr;
        proxy_set_header X-Forwarded-For $proxy_add_x_forwarded_for;
        proxy_set_header X-Forwarded-Proto $scheme;

        proxy_http_version 1.1;
        proxy_set_header Upgrade $http_upgrade;
        proxy_set_header Connection "upgrade";
        proxy_pass http://client/;
    }

    location /api {
        proxy_pass http://api:5000;
    }

    location /webapi {
        proxy_pass http://webapi:9000;
    }
}
This configuration file handles the reverse proxying of requests to the backend services based on the URL path.
Backend Microservices Containerization
Node.js Backend
For the Node.js backend, the Dockerfile looks like this:
# nodeapi Dockerfile
FROM node:14 AS nodeapi-build
WORKDIR /usr/src/app
COPY ./ ./nodeapi/
RUN cd nodeapi && npm install

FROM node:14
WORKDIR /usr/src/app/
COPY --from=nodeapi-build /usr/src/app/nodeapi/ ./
EXPOSE 5000
CMD ["/bin/sh", "-c", "cd /usr/src/app/ && npm start"]
This Dockerfile first builds the Node.js application and then creates a smaller image for running the application in a production environment.
Java Backend
For the Java backend, I created a Dockerfile with a multi-stage build:
# javaapi Dockerfile
FROM openjdk:8 AS BUILD_IMAGE
WORKDIR /usr/src/app/
RUN apt update && apt install maven -y
COPY ./ /usr/src/app/
RUN mvn install -DskipTests

FROM openjdk:8
WORKDIR /usr/src/app/
COPY --from=BUILD_IMAGE /usr/src/app/target/book-work-0.0.1-SNAPSHOT.jar ./book-work-0.0.1.jar

EXPOSE 9000
ENTRYPOINT ["java", "-jar", "book-work-0.0.1.jar"]
This Dockerfile first builds the Java application using Maven in a separate image and then copies the JAR file into a smaller image for runtime.
Docker Compose: Orchestrating the Microservices
To bring all the containers together, Docker Compose is used with the following docker-compose.yaml file:
version: "3.8"

services:
  client:
    build:
      context: ./client
    ports:
      - "4200:4200"
    container_name: client
    depends_on:
      - api
      - webapi

  api:
    build:
      context: ./nodeapi
    ports:
      - "5000:5000"
    restart: always
    container_name: api
    depends_on:
      - nginx
      - emongo

  webapi:
    build:
      context: ./javaapi
    ports:
      - "9000:9000"
    restart: always
    container_name: webapi
    depends_on:
      - emartdb

  nginx:
    restart: always
    image: nginx:latest
    container_name: nginx
    volumes:
      - "./nginx/default.conf:/etc/nginx/conf.d/default.conf"
    ports:
      - "80:80"

  emongo:
    image: mongo:4
    container_name: emongo
    environment:
      - MONGO_INITDB_DATABASE=epoc
    ports:
      - "27017:27017"

  emartdb:
    image: mysql:8.0.33
    container_name: emartdb
    ports:
      - "3306:3306"
    environment:
      - MYSQL_ROOT_PASSWORD=emartdbpass
      - MYSQL_DATABASE=books
This Docker Compose file defines services for each microservice, outlines their dependencies, and sets up necessary port mappings for communication.
Source code : devopshydclub/emartapp (github.com)
Conclusion
Turning a microservices application into containers is like putting together a puzzle. It includes many steps, starting from how the app looks to how it deals with data in the background. We also use something called a reverse proxy and a tool called Docker Compose to keep everything organized. Think of this guide as a map for your journey into containerization. But remember, there's more to explore! Keeping things updated, putting them out for people to use, and watching how everything works are all important to keep a strong and healthy microservices setup.
