Introduction
In this blog post, I'm excited to share my recent experience of creating a complete Continuous Integration and Continuous Delivery (CI/CD) pipeline on Amazon Web Services (AWS). I'll guide you through each step, making it easy to understand how everything came together.
The Beginning: Transitioning to AWS Services
Before this project, I relied on tools like Jenkins and managed my EC2 instances for virtual servers. GitHub was my go-to for code management. However, I wanted to explore AWS services that could streamline the entire process. This project marked my first step in that direction.
Leveraging AWS Services for a Smooth CI/CD Pipeline
This project revolves around leveraging AWS services to create an efficient CI/CD pipeline. Here's a detailed breakdown of how I achieved it:
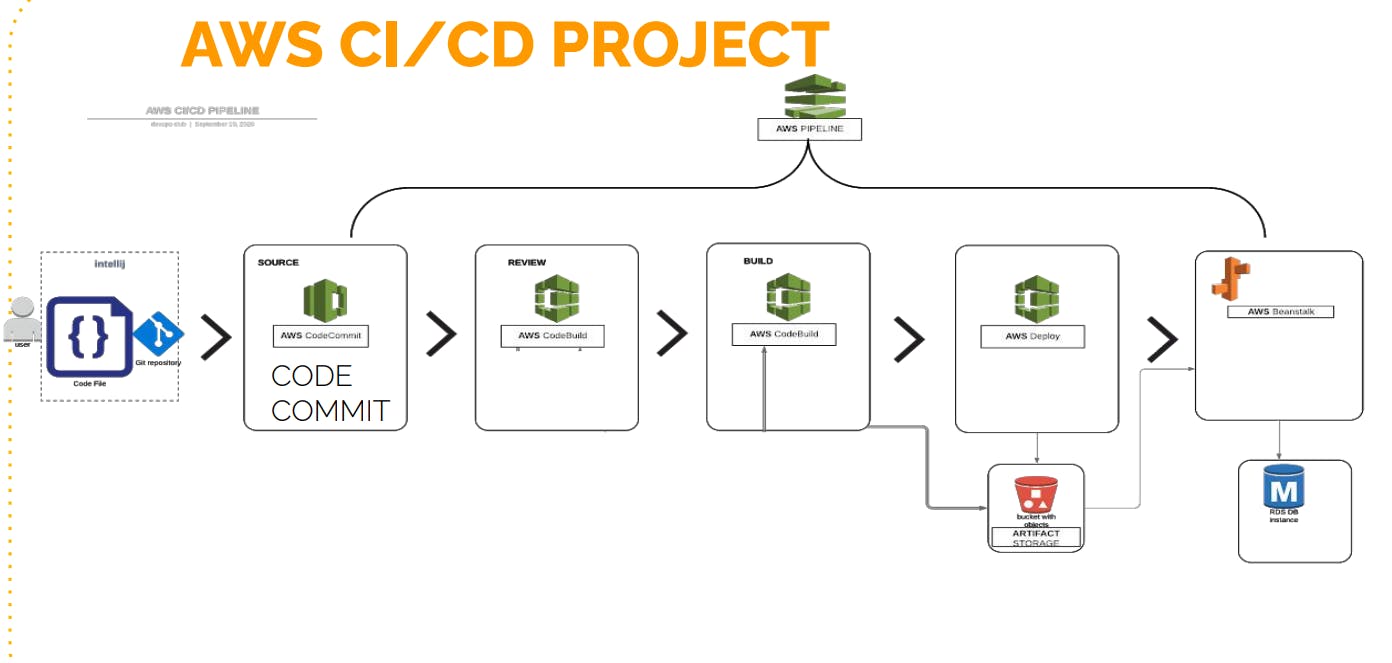
Step 1: Code Management with AWS CodeCommit
Rather than using external systems like GitHub, I opted for AWS CodeCommit. It's essentially an internal version control system within AWS. This decision ensured the security and convenience of keeping our code within the AWS ecosystem.
Step 2: Streamlining Artifact Building with AWS CodeBuild
AWS CodeBuild became my primary tool for compiling application components, similar to Jenkins' role. What's remarkable about CodeBuild is its seamless integration with other AWS services. I could easily create various CodeBuild projects to handle different tasks, such as code validation, building, and testing.
Step 3: Reliable Artifact Storage with Amazon S3
To ensure the safety and accessibility of application components and essential files, I relied on Amazon S3 buckets. Think of these as secure virtual containers where I could store and retrieve data whenever necessary.
Step 4: Automated Deployments with AWS CodeDeploy
For automating deployments, I turned to AWS CodeDeploy. It made deploying my application to AWS Elastic Beanstalk a breeze, saving both time and effort.
Step 5: Hassle-Free Hosting on AWS Elastic Beanstalk
AWS Elastic Beanstalk hosted my Tomcat application. Its easy setup seamlessly integrated with my CI/CD system, ensuring a smooth process.
Step 6: Effortless Database Management with Amazon RDS
My application required a MySQL database, and I chose Amazon RDS to handle it. Amazon RDS simplified database management, making it more manageable and maintainable.
Step 7: Orchestrating with AWS CodePipeline
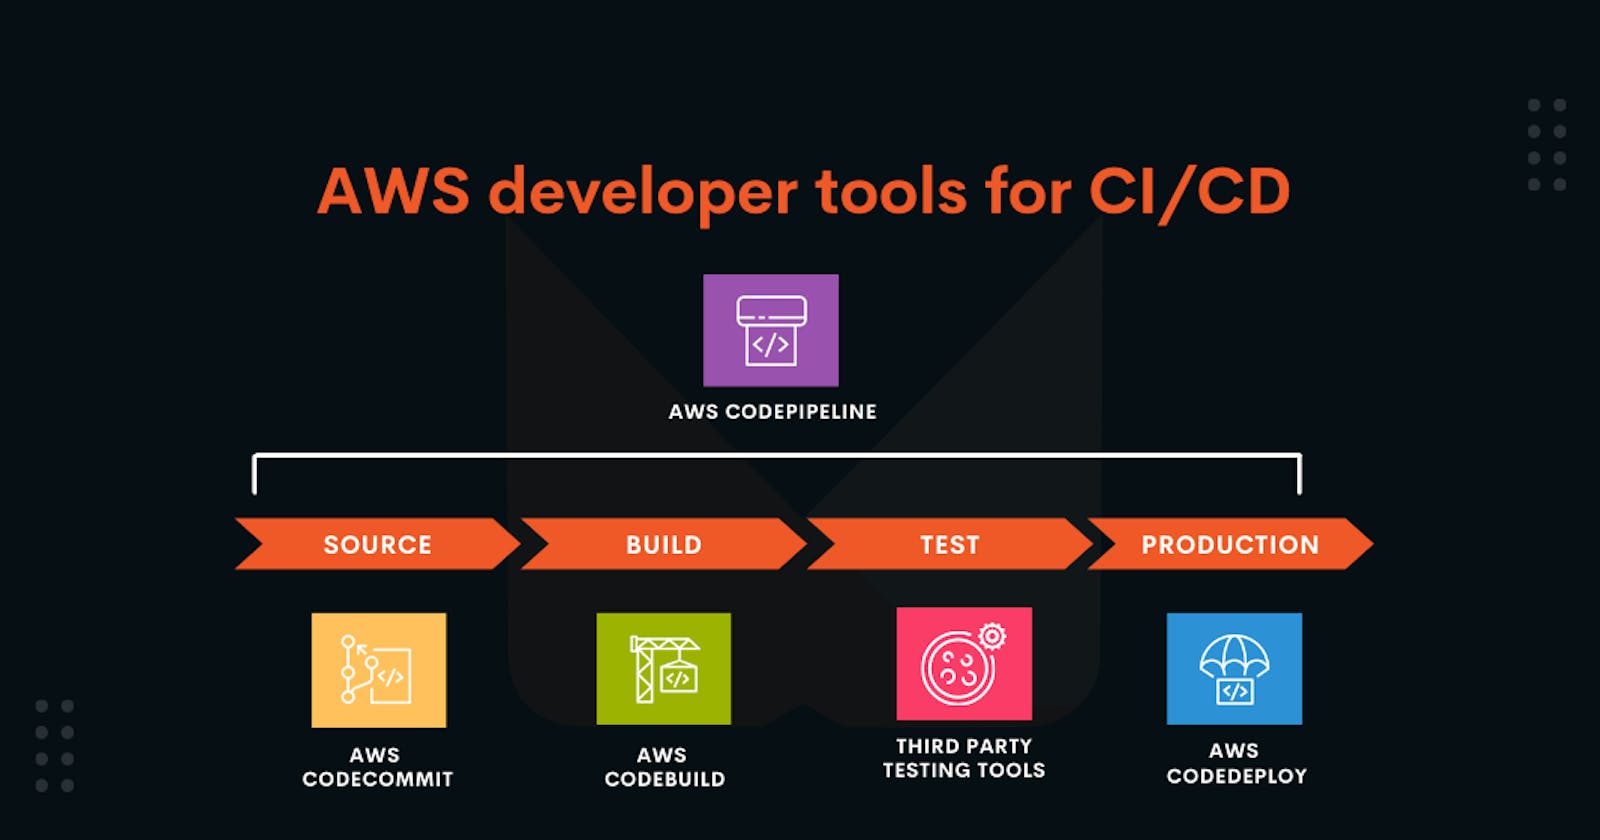
The highlight of this project was AWS CodePipeline. It acted as the conductor of the CI/CD process. Whenever a developer made changes to the code in the CodeCommit repository, CodePipeline took charge and automated everything, from code building to testing and deployment.

A Detailed Walkthrough
Now, let's dive into a step-by-step breakdown of how I brought this project to life:
Step 1: Building the Foundation
Setting Up Elastic Beanstalk:
First, I created a customized Elastic Beanstalk environment to suit my application's needs.
Why Elastic Beanstalk? It simplified the process of creating and running applications without the hassle of manual setups involving EC2 instances, load balancers, and monitoring tools.
Creating an AWS Elastic Beanstalk Application:
I began by creating an AWS Elastic Beanstalk application with a unique name.
Platform Selection: I chose the platform for my environment, opting for Java with Tomcat.
Environment Configuration: I configured environment settings, including security groups, instance types, and scaling triggers to tailor the environment to my application's requirements.
Environment Variables: While not needed for this project, Elastic Beanstalk offers the ability to set environment variables, which can be vital for connecting to backend services.
Review and Create: Before finalizing, I carefully reviewed all settings to ensure they aligned with my project's needs.
After clicking "Submit," the Elastic Beanstalk environment creation process began.
Configuring Amazon RDS:
Creating the RDS Instance:
- The next step involved creating an RDS instance. I followed default settings for a straightforward setup.
Configuring Security Groups:
- To ensure that my application running on Beanstalk instances could connect to the RDS instance, I configured security groups. This step involved allowing port 3306 in the security group.
Initializing the Database:
- I initiated the database setup by SSH'ing into the Beanstalk instance. This approach helped validate the connection between the Beanstalk instance and the RDS instance. During this step, I deployed the DB SQL file successfully.
Updating Health Checks:
- Before deploying my profile application, I updated the health check of the target group to "/login." This change was crucial to ensure the instances were marked as healthy during deployment.
Creating a CodeCommit Repository:
Creating a Code Commit Repository:
- To streamline code management, I established an AWS CodeCommit repository. Think of it as a secure and organized space to store all my code.
Generating SSH Keys:
- Secure access to the CodeCommit repository required SSH keys. I created a new IAM user named "cicd-user" with programmatic access. While I didn't need access keys, I attached a custom policy to grant the necessary permissions for my repository.
Uploading SSH Public Key:
- To authenticate with CodeCommit via SSH, I uploaded the SSH public key generated on my local machine. This key allowed for a secure connection to CodeCommit without exposing passwords.
Configuring SSH and Testing:
Next, I configured my local SSH client by creating a "config" file specifying the host, user, and SSH key for connecting to CodeCommit. I ensured the file permissions were set to 600 for security.
I tested the SSH connection using the "SSH URL" provided by CodeCommit to confirm proper authentication and troubleshoot potential issues.
Cloning the Repository:
- To verify that my IAM user had the necessary privileges, I attempted to clone the CodeCommit repository locally using Git. This step confirmed the IAM user's access to the repository.
Transitioning from GitHub to CodeCommit:
The final and crucial step involved transitioning my project from GitHub to CodeCommit. I began by checking out all branches from my local Git repository and confirming their checkout.
I fetched any existing tags from my local repository and removed the existing GitHub remote repository using the "git remote rm" command.
To add my CodeCommit repository as the new remote, I used the "git remote add" command with the CodeCommit SSH URL.
Finally, I pushed all branches and tags to CodeCommit using the "git push" command.
Step 2: Crafting the CI/CD Pipeline
Building and Deploying with AWS CodeBuild:
In this phase of the project, I dove into AWS CodeBuild to set up the CI/CD pipeline further. AWS CodeBuild served as the backbone of our pipeline, where source code was compiled, tests were run, and software packages were prepared for deployment.
Creating a CodeBuild Project:
- In the AWS Management Console, I found the CodeBuild service and created a new project, similar to how we create jobs in Jenkins. This project served as the central hub for all code compilation and testing tasks.
Configuring the Build:
Configuring the build was a pivotal step. I provided various details in YAML format through a build spec file, instructing CodeBuild on how to execute our build process. Here's what I did:
I specified the project name as "cicd-prod build."
For source code, I linked it to our AWS CodeCommit repository, choosing a branch for the build.
I opted for a managed image with Ubuntu as the operating system, as it included required runtime packages like Java and Maven.
I set the environment type to Linux, with a minimum of 3GB memory and 2 CPUs, making use of AWS's free tier whenever possible.
In the build spec file, I defined various phases:
Install Phase: I installed necessary packages and dependencies, such as Java.
Pre-Build Phase: I performed custom actions before the build, like updating packages and modifying configuration files (in this case, replacing database values with RDS values).
Build Phase: I specified the build commands, such as "MVN install" to create artifacts.
Post-Build Phase: I included additional commands, like running "MVN package," and specified the artifacts to be created and their upload location.
Uploading Artifacts:
- After configuring the build, I set up the artifact upload process. I defined the S3 bucket where the build artifacts would be stored and specified the base directory. Additionally, I ensured that the selected S3 bucket was in the same AWS region.
Logging with CloudWatch:
- I established CloudWatch logs to capture all build logs. This would be crucial for monitoring and troubleshooting any issues during the build process.
Conclusion: Integration and Testing in AWS CodePipeline
In the final phase of our CI/CD journey, we integrated all components to create a streamlined AWS CodePipeline. This is where everything came together, from source code to building and deployment.
Step 1: Testing the Build Job
Before integrating everything, it was crucial to ensure the build job worked correctly. To do this, we triggered a test build by clicking on "Start Build" in AWS CodeBuild. The build spec file guided the process, and we monitored the progress through "Phase Details" to observe each step in action, including install, pre-build, build, post-build, and artifact upload to S3.
Step 2: Integration with AWS CodePipeline
Once we confirmed the build job's success, we proceeded to create an AWS CodePipeline. This pipeline automated our CI/CD process. Here's how we set it up:
We named the pipeline "cicd-prod CICD Pipeline."
AWS CodePipeline automatically created a service role with privileges to access the required AWS services.
We configured advanced settings, including encryption, which was enabled by default.
For source code detection, we selected CodeCommit and the specific branch, enabling AWS CloudWatch Events to trigger the pipeline on new commits.
For the build provider, we chose AWS CodeBuild, linking it to our existing CodeBuild project.
For deployment, we selected AWS Elastic Beanstalk as the target environment, which we had already set up.
Step 3: Adding Actions and Flexibility
AWS CodePipeline offers flexibility by enabling us to add actions at different pipeline stages. For example, we demonstrated how to include a "Unit Test" action, which can run additional tests after the build. We also introduced manual approval, allowing human intervention before deploying to production.
We showed how you can customize the pipeline with additional actions, such as testing with AWS Device Farm, software tests with BlazeMeter, or integrating with Jenkins for specific tasks. The key is to use AWS CodeBuild effectively, as it runs commands and handles most tasks within the pipeline.
Step 4: Monitoring and Cleanup
After creating the pipeline, it automatically triggered a build and deployment process. We explained the importance of monitoring the pipeline's progress, which can be done by reviewing the pipeline's status, logs, and deployments within the AWS Management Console.
Finally, we highlighted the significance of resource cleanup. AWS resources like RDS instances and Elastic Beanstalk environments should be deleted to avoid unnecessary charges.
With the completion of this project, we successfully demonstrated how to set up a comprehensive CI/CD pipeline in AWS. We hope this journey equips you with the knowledge and skills to implement similar pipelines for your projects.
Lessons and Insights
During this project, I learned that AWS services make it easier to do Continuous Integration and Continuous Delivery (CI/CD) work. These services made things simpler and let me concentrate on making my application better without dealing with complicated tools and setups.
Keep an eye out for more articles and guides about each part of this project. I'm just getting started with cloud-based CI/CD, and I'm excited to learn more about what AWS can do. Happy coding!
