In this project, I've created a complete web application and made it accessible to everyone using AWS Elastic Beanstalk. I've outlined the process of setting up your application on AWS, so by the end of this project, you'll have your web app ready to go.
Prerequisites
Before we dive into the setup, let's ensure you have everything you need:
AWS Account: You'll need an AWS account to access the required services.
Default VPC: A Virtual Private Cloud (VPC) is AWS's networking layer. Ensure you have a default VPC created.
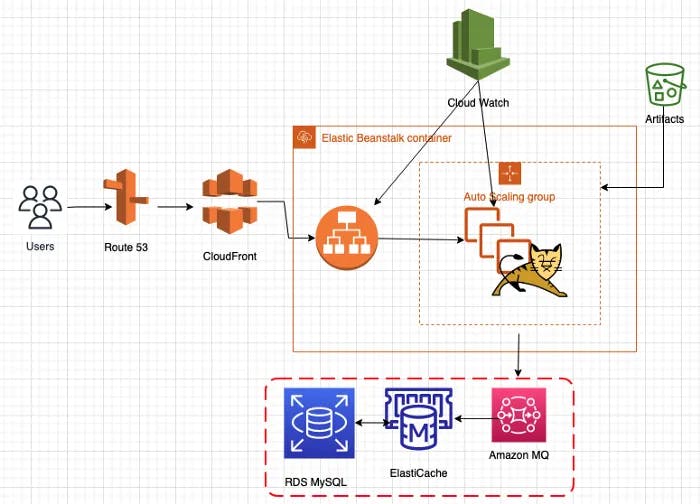
Amazon MQ: This is Amazon's managed message broker service.
Elasticache: A caching service to improve data retrieval performance.
RDS (Relational Database Service): A managed database service.
Maven: A build automation and project management tool.
JDK 8: Java Development Kit version 8 installed on your local machine.
Architecture of the project

Setting Up Backend Services
Created an Elastic Beanstalk Key Pair:
- I made a key pair named "vprofile-bean-key" for accessing Elastic Beanstalk's EC2 instances. I downloaded the private key and kept it safe for later SSH access.
Created Security Groups for Backend Services:
- I established a security group named "vprofile-backend-SG" to be used for ElastiCache, RDS, and Amazon MQ. I configured inbound rules to allow all traffic from "vprofile-backend-SG."
Set Up an RDS Database:
I created a subnet group for RDS named "vprofile-rds-sub-grp" and selected all availability zones and subnets.
A parameter group for RDS with the family "mysql5.7" was created, named "vprofile-rds-para-grp."
I set up the RDS database with specific details including the engine (MySQL 5.7), instance type (db.t2.micro), and secured it with "vprofile-backend-SG." It had no public access.
Configured ElastiCache:
I created a parameter group called "vprofile-memcached-para-grp" for ElastiCache and a subnet group named "vprofile-memcached-sub-grp" with all available zones and subnets.
Then, I set up a Memcached cluster named "vprofile-elasticache-svc" with a cache node type of cache.t2.micro, one node, and secured it with "vprofile-backend-SG."
Created Amazon MQ:
- I established an Amazon MQ service using RabbitMQ, set it as a single-instance broker with a name "vprofile-rmq" and an instance type of mq.t3.micro. The login credentials were set to username "rabbit" and password "bunnyhole789," ensuring private access.
Initialized the RDS Database:
- I copied the RDS endpoint from AWS console and created an EC2 instance (named "mysql-client") to initialize the database. I used an Ubuntu 18.04 OS and allowed SSH on port 22 in its security group. The instance utilized a key pair called "vprofile-prod-key" and a Userdata script to install the MySQL client. Inbound rules on "vprofile-backend-SG" were updated to allow connection on port 3306 for "mysql-client-SG." I connected to the RDS Database using MySQL client, created a database named "accounts," and imported the necessary SQL code.
Created the Elastic Beanstalk Environment:
After setting up backend services, I copied the endpoints for RDS, ElastiCache, and Amazon MQ.
I created application servers on Beanstalk with the name "vprofilejavaapp-env" and chose the Tomcat platform. Instance settings, capacity, and security were configured as needed. The EC2 Key Pair was set to "vprofile-bean-key."
Finally, I updated the backend security group and Elastic Load Balancer to allow connections from the Beanstalk application security group on ports 3306, 11211, and 5671. I built and deployed the application, ensuring it was ready to host and handle a growing user base.
By following these steps, I've successfully set up a scalable backend infrastructure on AWS, ready to host my application. Best of luck with your project!
